After all the hard work of creating a logo, finding a good vendor, successfully selling a few orders to your Instagram followers using Cash App or Paypal, the feeling is rewarding, but something is missing... “I’ve got no website, people won’t feel I’m legit, ugh!”.
I’m sure many of our readers here today have had similar moments, what’s more, frustrating is that you are trying to make a website, but just don’t know where to start, don’t worry! We have got you covered! Here is a step by step guide on how to get your website up and ready.
Step 1: Find The Right Ecommerce Website Builder
If you have actually got to the step of researching on how to make a website, you have probably heard of platforms like “Godaddy”, “Wix.com”, “Shopify” and others. These eCommerce builders are online software that lets you build your very own online store, without needing advanced tech skills, coding knowledge, or a ton of money. All you need is an internet connection and a great business idea! With so many options to choose from, we recommend Shopify since this website is built using Shopify, it’s easy to navigate, very clean look and has tons of apps to help you grow your business, but bear in mind, it is harder to change the overall look of the website without some serious coding skills. The eCommerce store plans start at $29 a month and you have a 90-day free trial right now due to the COVID-19 pandemic, a perfect chance to work on your store under quarantine.
Step 2: Get A Domain Name For Your Store
A domain name is a bit in a URL that identifies your store’s(website) name.
A good domain name is a key to launching a successful online store. It builds trust with customers and helps establish your brand.
You can buy a domain name through Shopify for around $10 per year. Alternatively, you can use a domain name registrar such as Godaddy.com to purchase a domain and link it to your online store builder.
Step 3: Customize Your ECommerce Template
When you open your Shopify account, you get to use what template you want to work with, and so the fun began!
Customizing the template is easy, and you can change just about anything. This includes:
- Product Photos
- Text fonts and size
- Theme Photos
- Collections
- Connecting Social Media
- And more.
Don’t forget to embed apps in your store. These are found in the Shopify app store, can be used to cover any features you need which the platform may not already have built-in, just note that the most useful apps are gonna cost you a little bit money, but you get to choose what you think is essential in building your business. You might say “all the talk is easy, how about showing me an example?”, we already thought of that, here is goes:

To make this page, we used the “debut” theme, click the “customize” button, on the left, you will see all the elements of the website you are working on, on the right, you will see what the store will actually look like. There are 3 big sections on the left side, “Header”, “Footer” and the midsection where you add different styles of blocks into the homepage to make it look pretty and professional! A “header” is where you put your logo and menu, this part stays on top in whichever page you click on this store, it functions as a navigation tool for customers to find the products/information they need. A “footer” is on the bottom of all the pages where you put additional information or links to your policies so people can check them if needed. Both of them are very important! As for the midsection, where you will put all the beautifully taken pictures of your luscious hair, you can choose either a “slider” or “banner” to be the first thing that pops up when someone comes to your online store, put a good, eye-catching picture there to make a good first impression!
Step 4: Add Your Products
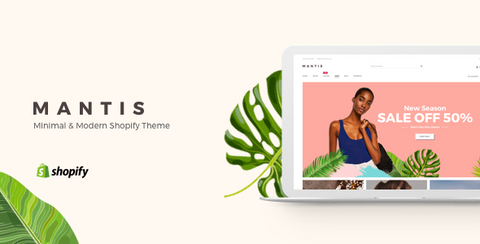
Now you’ve created a stylish online store using a template, you need to add your products.

The image above shows how you can combine style with minimalism to create a unique look.
The main things you need to add a product are:
- Name
- Price
- Category
- Weight (for physical products)
- File (for downloadable products like ebooks).
Shopify lets you sell unlimited products on their cheapest pricing plan, but other eCommerce website builders may limit you on lower-tiered plans.
Three key ingredients to uploading great products are:
- Product images
- Product descriptions
- Product categories
Product Images
Your images and videos will do most of the “talking” when someone is looking at your store, let’s be honest, all hair sellers sell the same patterns and lengths, but why would a customer choose yours instead of another seller? It’s likely that your pictures showed what she could look like when she gets the hair, the confidence, and glamour! And here are some tips on the images you’ll use on the website:
- High-quality images – Blurry or pixelated pics do more harm than good!
- Take your own photos – Originality is really important in the hair game.
- Unification – Use a tool like Photoshop or Pixlr to resize your images to the same size so when they are shown side by side, your store has a clean look.
Product Description
A detailed product description can be the difference between making a sale and not.
A very important thing to keep in mind when writing product descriptions is SEO (Search Engine Optimization). This is where you will rank in Google when customers search for products like yours. The higher you rank, the more traffic you get, and online business, traffic = $$$!
Product categories
Have you been to a website where you like what you see on the home page, but when you click into another page, you just can’t find anything you are looking for? Trust me, it drives away visitors! Categorization is so important in this hair game when customers want their body wave bundles, and they want them in blonde, you need to find a way to categorize everything so they can hop on the store and go straight to that 22” 24” 26” blonde body wave deal page to place the order if she spends 2 mins but can’t figure out where things are, chances are that one of those “factory” vendors that cold messaged her on Instagram will get the sale before you.
Step 5: Set Up Payment Methods
Next, you need to set up your payment method. This is a crucial part of converting a browser into a buyer after you set up Shopify Payments, your customers can make credit card payments on your store.
Shopify makes this easy for you, they help by connecting you directly to multiple different payment options, such as PayPal, Visa, Apple Pay, and Mastercard. We strongly suggest you use Shopify Payments, Shopify Payments is the simplest way to accept payments online. It eliminates the hassle of setting up a third-party payment provider or merchant account and having to enter the credentials into Shopify. With Shopify Payments, you're automatically set up to accept all major payment methods as soon as you create your Shopify store. Here is how to set it up:
You can activate Shopify Payments from the Payment providers page in the Shopify settings. When you set up Shopify Payments, you need the following information:
- your Employer Identification Number (EIN)
- your banking information
- the average price of your orders
- the average shipping time of your orders

Step 6: Shipping Settings
You’ve added products and payment options for customers to buy them. Next up is making sure you can deliver those products. You’ll need to pick a courier to deliver your products safely to your customers. Popular couriers include:
- USPS
- UPS
- FedEx
Shopify has partnerships with both UPS and USPS, the rates are lower than what you anywhere else. This makes your life much easier, as it gives you access to shipping discounts and real-time shipping rates. Also, we will revisit this topic in another blog specifically talking about how to set up shipping, how to calculate time and offering free shipping to boost sales.

Step 7: Check, Test And Go Live
You should now have added your products, customized your store’s template, set up your payment and shipping, and sorted out your store’s settings.
You’re almost there… But there’s one important step to go before you’ve finished creating your online store: testing it!
Testing your store is the best way to make sure you’re satisfying your customers’ needs. When previewing and testing your store, here are the key things to check:
Does Your Checkout Work?
When testing your store, pay special attention to the checkout process. Make sure:
Orders work across all payment methods
Your shipping options and charges are correct and visible
The items and price in your cart are correct
Discounts/promotions apply
The simplest way to test your checkout is to place an order and then immediately refund yourself. This is also a good chance to test the refund process, as well as your email notifications.
Do Your Store’s Functions Work?
Next up is making sure your store actually works.
Make sure any clickable button or link is working. Hammering away on their mouse with no reward will frustrate your customers.
Your navigation bar should be easy to maneuver. It should feel like sailing around a calm lake, not swerving around potholed roads with lots of dead ends! Ask friends and family to test your site and get some feedback.
Have You Checked Your Store’s Content?
Many merchants make the mistake of launching an online store that’s full of content errors. This makes your store look amateurish.
Go through your store with a fine-toothed comb and check for poor spelling and grammar. This is also a good opportunity to check all your pictures – make sure they’re all optimized for site speed and accurately promote the product.
Does Your Store Work On Mobile?
Right now, mobile commerce is how we buy everything! In short, it’s vital that your site works perfectly no matter what device your customer is using.
This is one of the biggest benefits of using an online store builder like Shopify. They make it easy to check what your store looks like on different devices, as well as how it functions.
Your store needs to be responsive on mobile, tablet and desktop. You can test this in your builder’s preview mode, and toggle to the mobile icon to start experimenting.

And just like that, if all the boxes are checked, you are off to make some $$$! If you have any questions, please contact us, we will be happy to help! We have a lot more content like this coming up. Also, please don’t forget to share this article to your friends and family who are in the process of starting a hair business, an online boutique or anything at all, the same rules apply, we look forward to seeing you succeed!