Let’s face it, without a logo, there is no brand! Whether it’s the “Jumpman” logo or the tri-star leading the presence of a Mercedes, when you see those logos, you know it’s something good! In the hair game, it’s the same! That’s right, today I’ll teach you guys how to make a logo(as a beginner) step by step.
Before I start, I want to make a disclaimer that this tutorial is not one that’ll turn you into a graphic designer overnight, It is just to help a beginner who’s stuck in this process to get over the hurdle. Designing a logo is very much like drawing, you need a canvas in the right size, but the difference is that you keep adding different “layers” to this digital canvas and combine them, there comes your logo.
I know most of us don’t use paid editing programs like Adobe Photoshop or Adobe Illustrator, so we are going to grab a free alternative for today’s tutorial ---- Pixrl.com. Go to their homepage, here is what you’ll see:

Since we are beginners, let’s try the most basic version -- “Pixlr X”:


Now we need to make a canvas, so hit “create new” on the left side, you’ll see many different options of sizes, what are they?
Before I answer that question, we’ll introduce the word “Pixel”----Short for Picture Element, a pixel is a single point in a graphic image. Graphics monitors display pictures by dividing the display screen into thousands (or millions) of pixels, arranged in rows and columns. The pixels are so close together that they appear connected. So the options you saw in the middle are all presets that are most frequently used, however, we are going to do 600 pixels by 600 pixels square canvas, that way the file size is not going to be too big or too small plus it’s symmetrical. You can also change the title to any name you want, here I used “my logo”:
Selecting the right background color is very important because it affects how the overall image will look like, so please don’t forget to select a background for your canvas, I did a “white” color for the tutorial, click “Create” and we’re onto the next page:

You will see different icons lined up on the left side, we are going to hit the click that looks like a “T”, it means “text”, then a “add new text” box will pop up, you need to click that box as well:
We can see that there are a lot of new elements listed in the column after we just clicked, there is a textbox where you can type in anything you want, then it’ll show up on the canvas within the limit of these mint-colored lines. Under the textbox, you can control the alignment and font as well as the color of the words you want to display, let’s put something in the textbox now and play with the font and color, see what happens:

I put “BEST HAIR” in the textbox and changed the color to mint blue, it looks popping already!! Now we are going to change the font and totally transform the look, what you do is to left-click the “Font: Arial” box and a list of very cool fonts will show up, now you just need to hover over these fonts, they will show up on the canvas in the words you put in:


I decided on the classic but playful font of “Berretti”:

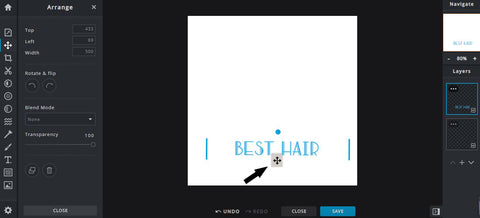
Here I need to explain something, when you hover your mouse over to the canvas, you will see there are two short vertical lines and a mint blue colored circle, the lines are the borders of your textbox, and the circle serves as the pivotal point which you can control which direction the textbox will pivot around, they come very handily if you want to add a little style into your design.
Now I’m placing my mouse over the circle when you left-click on your mouth and hold, there appears “hand” icon that feels like “it” is grabbing on the box, you can drag “it” left and right and it’ll change the direction of how the words will display, for today tutorial, I’ll just do the normal text:


I plan to have a silhouette of a lady in the middle of the canvas, so I want the text “best hair” underneath the silhouette, to do that, I’ll move the textbox down then put a silhouette image onto the canvas when you hover your mouse in between the 2 lines, you should see an icon with 4 directions on it, there, click hold and drag your mouse again, you can see the textbox move in the direction that your mouse moves:
The textbox is now in a perfect position, but what about the silhouette I was talking about? Don’t worry, we’ll get there! Now open another tab on your browser, go to vectorstock.com:

Here you will find a lot of free vector images(they are usually black and white images that can expand or shrink without damaging the image quality), since we are doing a hair logo, we will search for “woman hair” as our keywords:

You’ll see that there are many vector images coming up, but please make sure you select the “free vectors” option on the top, then run the search again, you’ll see lots of new vector images, and this time, you can download them for free!

I selected this silhouette of a lady with big beautiful hair, so we’ll use it as part of our logo today. Click “free download”:
There is a window asking for sign-in, you can use any one of the 3 ways to sign-in and then you’ll be taken to the next page:

At this point, you are logged in, but you will need to get back searching for the same keywords again and find the same vector image before you logged in, only this time, you can actually download the image with no hustle:

After saving the vector image, we can come back to pixlr.com and import the image to the canvas. To do so, you’ll need to find the image icon to the left of the canvas:

After clicking the “image button”, a new window will pop up, it’ll ask you a question, this question is basically asking if you want to open a new document(in which case, you’ll be taken to a brand new page), or do you want to stay in this file but put this vector image on top of other layers(meaning the text “BEST HAIR”), we want to do that, so click “add current”, then the vector image will be added:

Notice how our vector image is so big that it spilled out of the canvas?

Don’t worry, we can resize the canvas by moving your mouse to the right, there is the part that says “80%”, you can adjust this number up or down to resize how big the canvas fits on your screen, I made it “40%” and I was able to resize the vector image easily as well:


After wiggling the textbox layer and the vector image layer a little bit, I found the overall look of the image to be somewhat presentable, so I decided to keep this file and start using it as my new logo:


When you save this logo image, a new window will show up, where you can decide the file name and the file type, the most commonly used image file on the internet is “jpg”, so that’s what I’m choosing today. And I want the image to have a higher resolution so it’s not blurry, I set the “Quality” to a higher number(This usually means the file size will be slightly larger, but I recommend you to always get a higher quality image. Also, if you are working with a logo that has no background, please make sure to save the file as “png”), hit the “download” button and you have made your first step to becoming a millionaire!
Some of the readers might think this is too simple, you alreay know how to do this, or that you think the logo I made is ugly. Well, that’s ok! We’d love to see the logos you made after reading this blog, please feel free to contact us and we will tag you on our Instagram page showing off your design! This blog is the first “step by step” tutorial blog we have made. We will be making more of these and teaching different skills in the e-commerce space later on, until then, happy creating!